
Initiative Actions
← Back to Initiatives section
-
Availability
- Plan: All
-
Roles and Permissions
- Add/Delete: Admin, Editor, Product Manager
- Edit: Admin, Editor, Product Manager
- View only: Reviewer
Initiatives group together multiple ideas and stories and explain at a high level what it is that you're working on, why, and for whom you're building things for. They help make sense of your strategy and link back to objectives, so you understand how the work that you're doing is having an impact on your business and on your customers.
In this document we will review how to:
- Add initiatives
- Generate Initiative Description and Target Outcomes from Initiative Title
- Adding a Target Date to an Initiative
- Generate AI initiatives from key results
- Import a roadmap from an image or PDF
- Add dependencies
- Mirror initiatives across products and columns
- Delete initiatives
- Duplicate Initiatives
- Share initiatives
- Move initiatives to other products
Add initiatives
To add a new initiative, go to the roadmap page and click on Add an initiative to prompt the slideout. Alternatively, press the + Add button from the side navigation bar and select Initiative from the quick add menu.

Give the initiative a title and a description so all team members know what it's about. If you can, try to form the title and description as a hypothesis: How can we do x in order to y. You can also add target outcomes that the initiative will help to achieve. An example of a target outcome could be an increased user adoption rate or a customer retention percentage increase.
Add any attributes that are relevant to the card, including the Objective, Tags, Column, and whether you'd like to make it Public or keep it as Internal.
Public and Internal are filter options for sharing your Initiatives, they do not actively hide or reveal your initiatives this is done via the Roadmap Publishing. The Public option can be used to indicate the initiative should be visible to anyone you share your roadmap with, while the Internal option would be specifically for stakeholders who may not be ProdPad users (for example) but should still see internal updates. This ensures that you can share relevant parts of your roadmap with internal teams or stakeholders without exposing it to the general public. To read more on Roadmap Publishing, click here.
From this view, you also have access to add ideas and user stories from your backlog.
 If you ever need to edit the initiative, simply click on it to open up the initiative canvas. Formatting is available through our text editor when highlighting any text available.
Generate Initiative Description and Target Outcomes from Initiative Title
You can use ProdPad's GPT-powered AI helper to create Initiative Descriptions and Target Outcomes from the Initiative title. To do this, just give your Initiative a title and click the AI Assistant button.

The result will be displayed in the module where you have the option to Discard (which will remove the AI-created result), Try Again (which will attempt to create a new result), or Add to Initiative.

You can also click into the module to edit the results as needed before adding them to the Initiative.
Adding a Target Date to an Initiative
To add a Target Date to an Initiative, go to the Roadmap page and click on a Product followed by an Initiative. You'll then see a Target outcomes menu, which allows you to add a Target Date to the Initiative.

Click the Add button next to “Target Date” to set a target date for the Initiative. You can select a specific date, a target month, or a target quarter depending on your preference. If a date isn’t required, the field will display “Not set” by default.

To change the date, click Edit and select a new date. You can also click Clear to reset the field back to Not set.

You can read more about Target Dates here!
Generate AI initiatives from key results
ProdPad's GPT-powered AI helper helps you draft initiatives from key results.

Import a roadmap from an image or PDF
If you already have a roadmap living in a slide deck, spreadsheet export or document, you don't need to recreate it card by card. ProdPad's AI helper can read an image or PDF of your existing roadmap and turn it into Now, Next and Later initiatives for you to review and add.
To get started, go to the Roadmap page and click Add an initiative. You'll see a dropdown with three options: Import via image, Import via PDF and Generate initiatives. If your roadmap is empty, you'll also find the import option in the empty state. Select Import via image or Import via PDF and your file browser will open. Only the file type you've chosen will be selectable, so pick a single image (such as a screenshot or photo of your roadmap) or a single PDF.
Once you've submitted your file, the AI modal will open and display a thinking state while your roadmap is being read. When it's finished, the suggested initiatives will be shown grouped into Now, Next, Later and Candidate. Select one or more initiatives you'd like to keep, then confirm your selection to add them to your roadmap. Anything you don't select is simply discarded. As with all AI-generated content, it's worth reviewing each initiative and editing the title, description and target outcomes so they reflect how your team talks about the work.
 Good to know
Importing is available on the Product Roadmap, Product Line Roadmap and Portfolio Roadmap, and can be used as many times as you need. The clearer the roadmap in your image or PDF, the better the results - so a legible, uncluttered file will give you the strongest starting point.
Add dependencies
Dependencies (previously called Linked Initiatives) allow you to connect Initiatives together so you can track dependencies and related work across your roadmap. This helps teams understand which Initiatives are blocking progress, which depend on other work being completed, and how different streams of work connect across products.
To add a dependency, open an Initiative and go to the Dependencies section on the Initiative canvas.
[Screenshot placeholder: Dependencies section on the Initiative canvas]
Click Add dependency and choose one of the following relationship types:
- Blocked by – this Initiative depends on another Initiative before it can progress.
- Blocking – this Initiative is preventing another Initiative from progressing.
- Related – both Initiatives are connected, but neither depends on the other.
[Screenshot placeholder: Add dependency dropdown showing Blocked by, Blocking and Related]
The Add dependency slideout will open. Search for the Initiatives you want to link - they're grouped by product, with each product's avatar beside its name. Select one or more Initiatives (selected Initiatives move to the top of the list with a tick), then click Save.
[Screenshot placeholder: Add dependency slideout with Initiatives grouped by product and two selected]
Linked Initiatives are grouped on the canvas by relationship type:
- Blocking
- Blocked by
- Related
- Resolved
Each linked Initiative displays its title, roadmap column, and product name so you can quickly understand how work is connected.  Blocking and Blocked by relationships can be marked as resolved once the dependency has been removed.
To do this, hover over the linked Initiative, open the ... menu, and select Mark as Resolved.
Resolved links remain visible in the Resolved section of the Initiative canvas, providing a historical record of completed dependencies.
If a relationship is no longer needed, open the same menu and select Unlink to remove it completely.

Roadmap cards display dependency icons for any unresolved Blocking, Blocked by and Related links. Hover over an icon to see each linked Initiative's name, product and column, and click a linked Initiative to open it in the side peek.
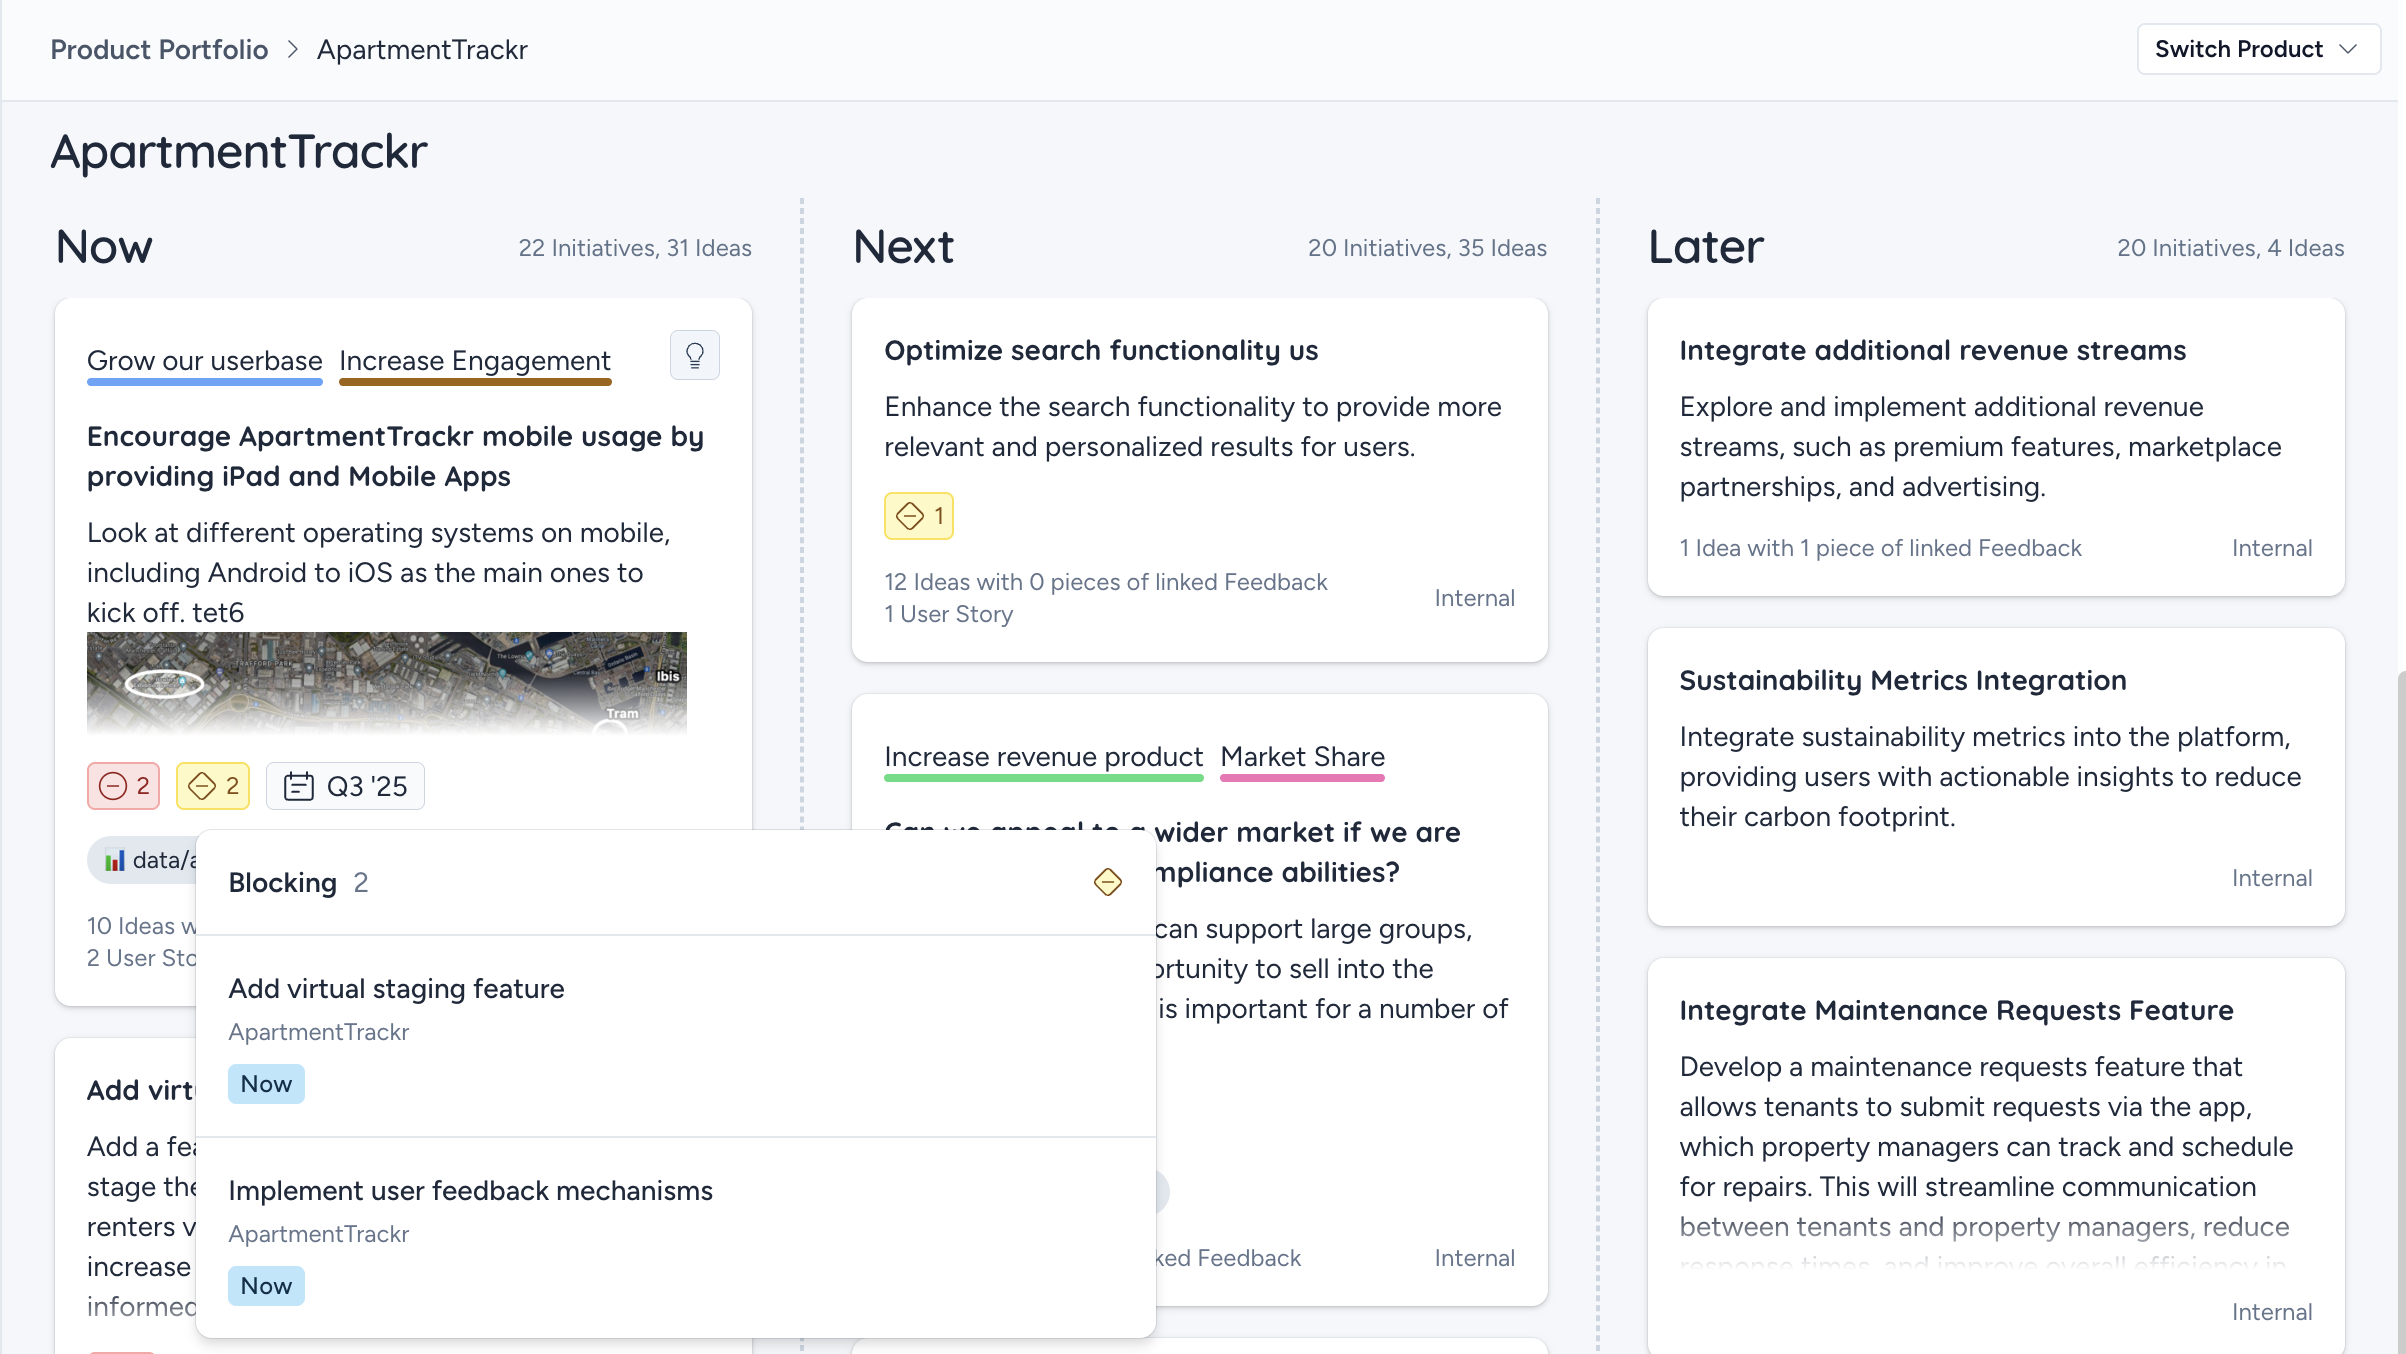
Dependencies can be created between Initiatives in different products, helping teams visualise dependencies across their entire portfolio. If an Initiative belongs to a private product, it can only be linked to other Initiatives in that same private product, and Initiatives in private products won't appear when adding dependencies to open Initiatives.
Mirror initiatives across products and columns
Mirrored initiatives let the same Initiative appear on more than one product roadmap, or in more than one column of the same roadmap. This is ideal when several teams are working on the same piece of work, or when one Initiative spans more than one stage of your roadmap.
It's still one Initiative, so any change you make - to the title, description, linked ideas, comments or progress - shows up everywhere it appears.
To mirror an Initiative:
- Click the Initiative to open the canvas.
- Under the Attributes section, click Edit to open the Edit attributes slideout.
- Click the Product dropdown and select each product you want the Initiative to appear on. Products are grouped by product line, and selected products move to the top of the list with a tick.
- Each selected product appears below the dropdown with its own column selector. Choose the column the Initiative should sit in on that product's roadmap (e.g. Now, Next or Later).
- To show the Initiative in more than one column of the same product, select that product again and choose a different column.
- Click Save.
 On the roadmap, mirrored Initiatives show a columns icon (when the Initiative is in more than one column of the same product) and/or a products icon (when it's on more than one product roadmap), each with a count. Hover over either icon to see every product and column the Initiative appears in. Mirrored cards also have a coloured border matching the icon so they're easy to spot.
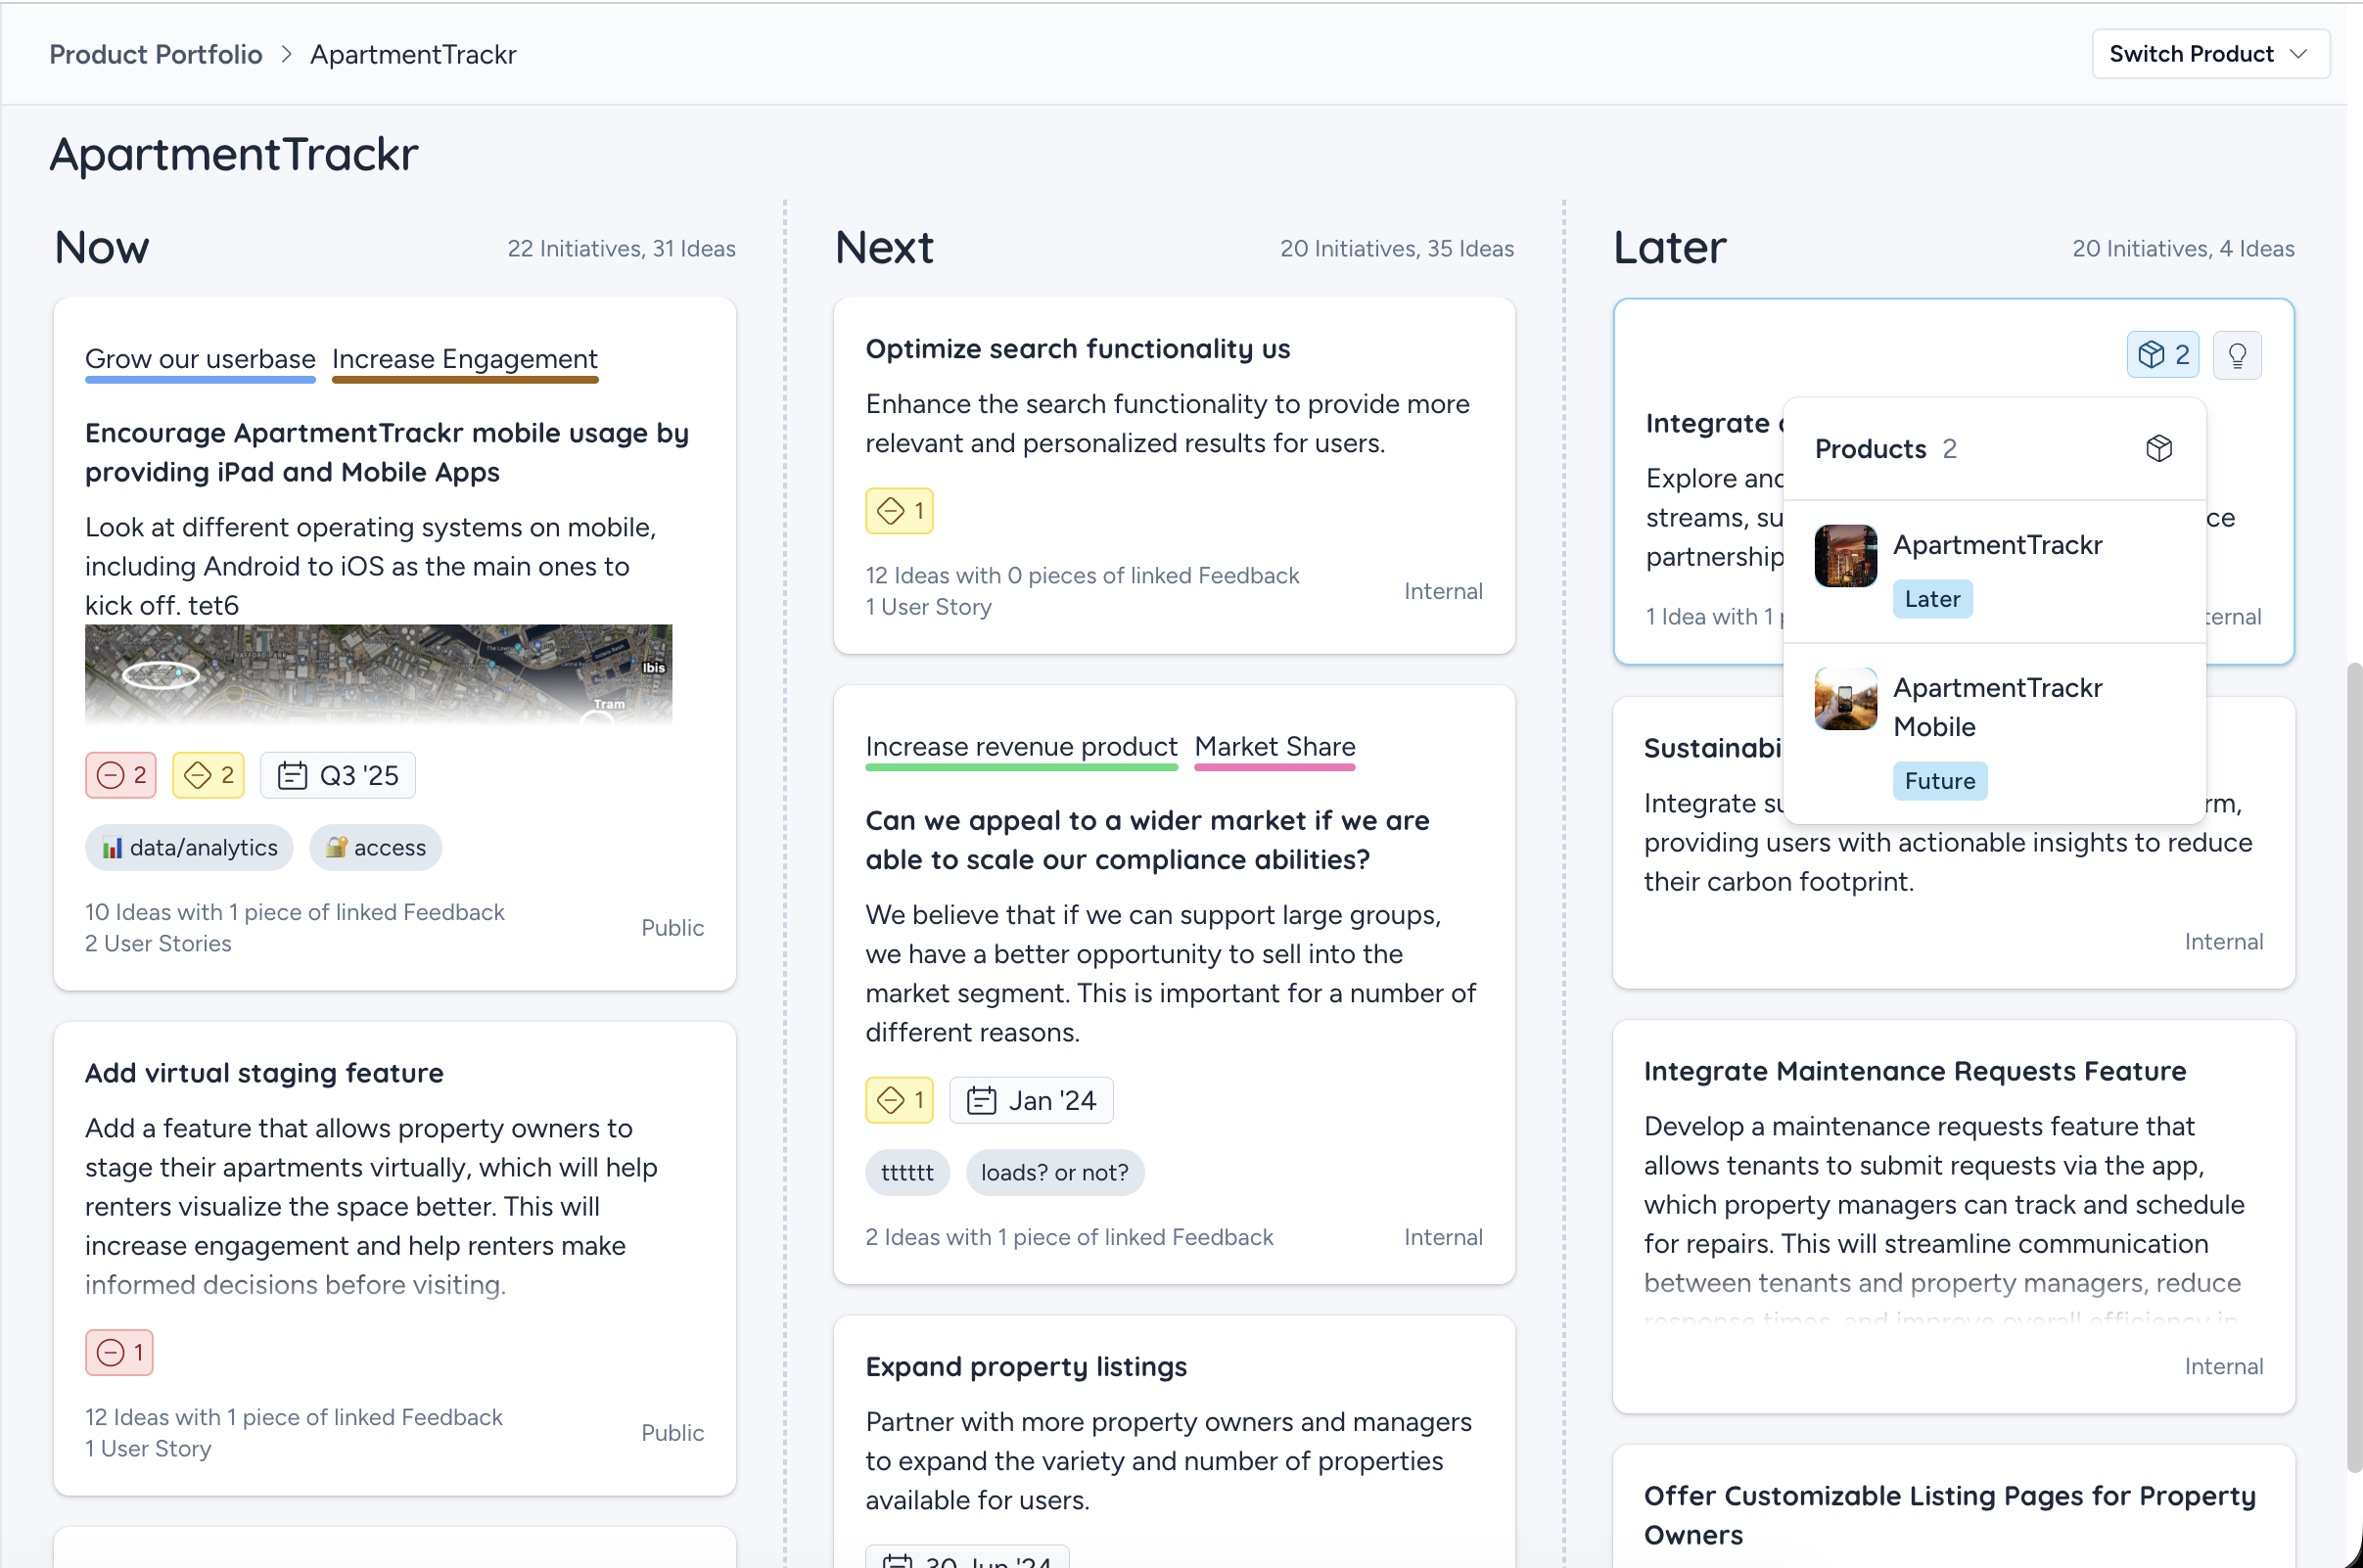
On the Initiative canvas, each product in the Attributes section displays a badge showing which column the Initiative sits in.
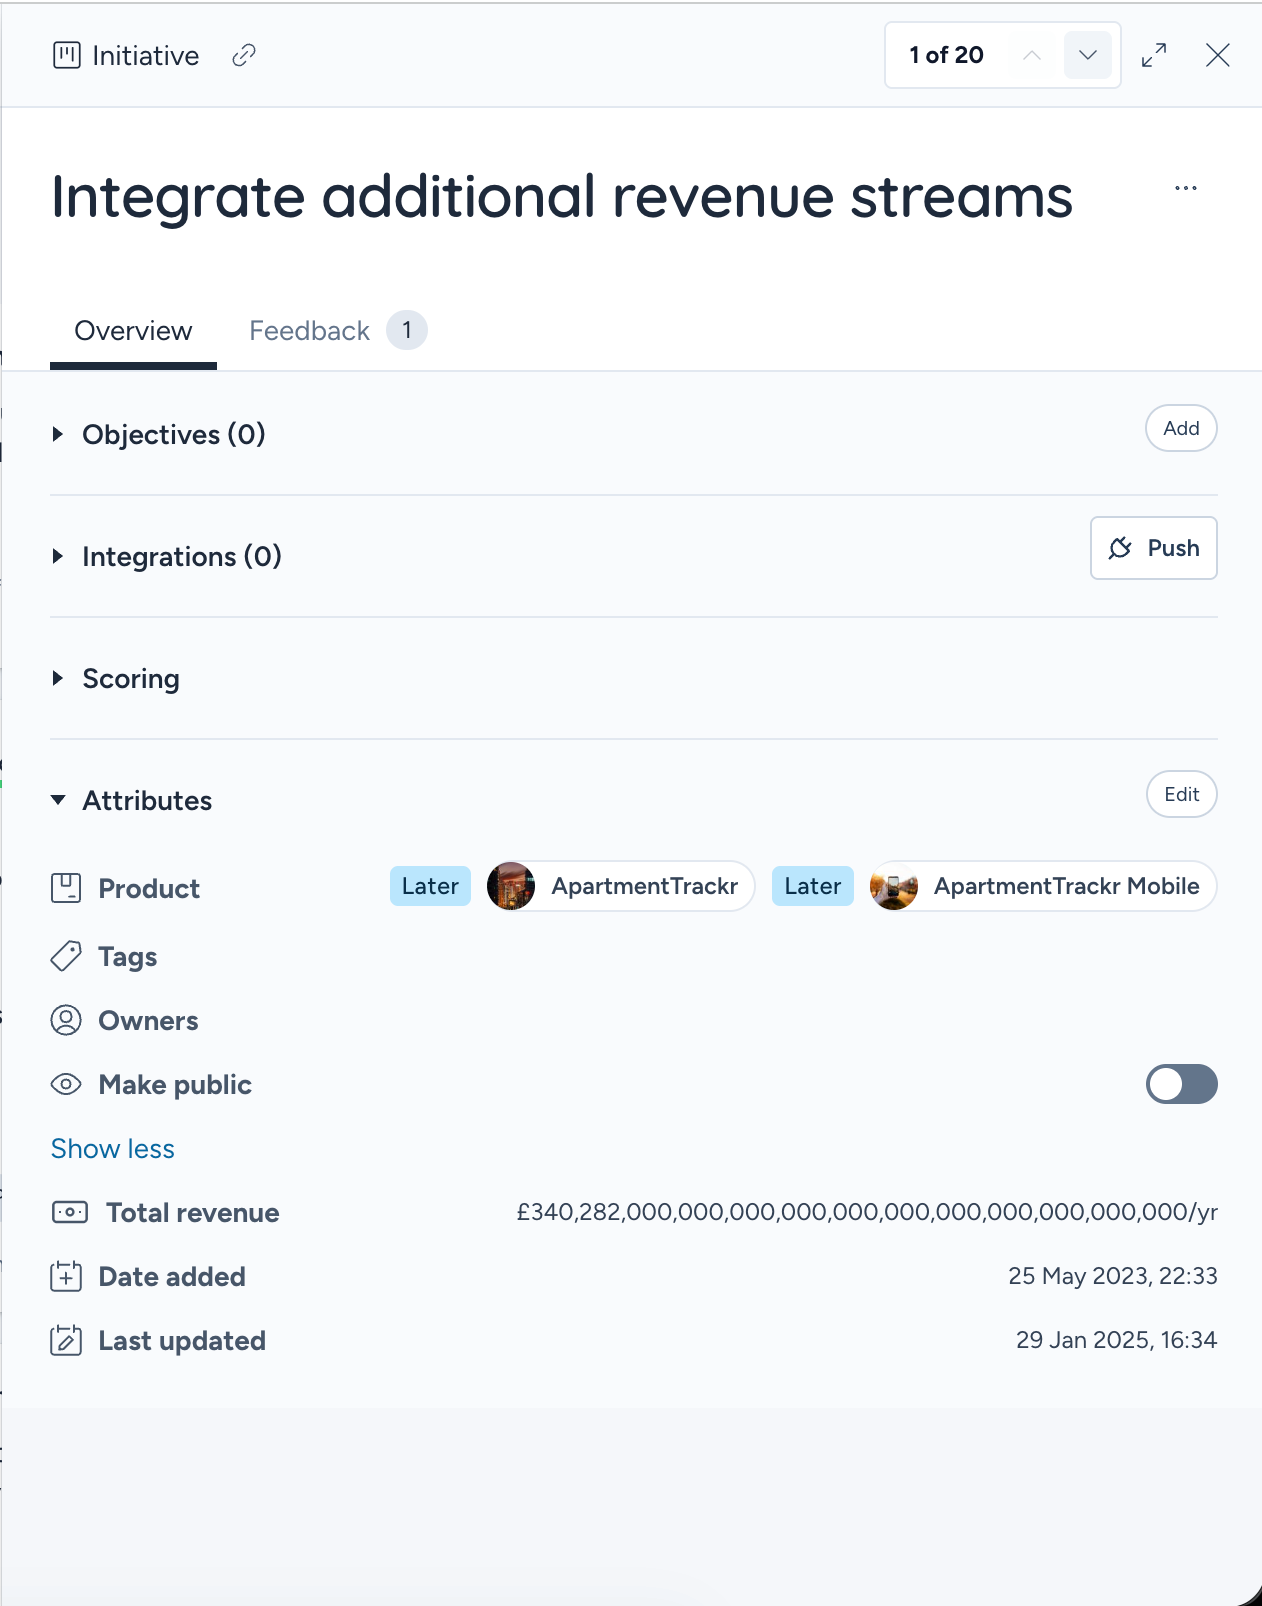
To stop mirroring, open Edit attributes, remove the product or column you no longer need and click Save. The Initiative is removed from that roadmap or column but stays everywhere else - removing a link never deletes the Initiative. Deleting the Initiative, however, removes it from every roadmap it appears on.
Good to know
- An Initiative can only appear once in any given column. If you drag it into a column where it already exists, the move is blocked and a tooltip explains why.
- Only one instance of an Initiative can be in Completed at a time. To complete another instance, first remove its existing column link in Edit attributes, then move it to Completed.
- Moving a mirrored Initiative to Completed on one product roadmap doesn't affect where it sits on other product roadmaps.
- Initiatives in private products can't be mirrored. If you select a private product alongside any other product, Save is disabled and a tooltip explains why.
- Initiatives can't be mirrored across separate ProdPad accounts.
Delete initiatives
To delete an initiative, click on it to open up the initiative canvas and click the ellipsis tool on the top right. Here you will find the option to delete it.

Important!
Once an initiative is deleted, it cannot be recovered. If the initiative is mirrored, it will be removed from every product roadmap and column it appears in.
Duplicate initiatives
If you need to duplicate initiatives and content within them - it's as easy as pie! Duplicating Initiatives can be a great time-saving solution if you have multiple products, but a problem to solve that may be relevant across your portfolio.
To begin:
- Click on the initiative you wish to duplicate
- At the top right corner, click on the ellipsis menu
- Select "Duplicate" from the available options


The duplicated initiative will appear directly under the original card, with the title set as "Copy of..." by default.

If you want the same Initiative to appear on several product roadmaps and stay in sync, use mirrored initiatives instead of duplicating. A duplicate is a separate copy that won't update when the original changes.
Share initiatives
Initiatives can be shared directly using the share initiative URL option.
To do so:
- Click on the initiative to open the canvas.
- Locate and click the paperclip icon on the top left-hand side of the initiative.
- The URL will automatically be copied to your clipboard once clicked.


Further Reading
Move initiatives to other products
If you'd like to move an initiative to a different product - no problem!
First, click on the initiative you want to move to open the canvas.
Under the Attributes section, click Edit to open the Edit attributes slideout.
Click the Product dropdown. Products already assigned to the initiative appear at the top of the list with a tick. Select the product you want to move the initiative to, choose its column, and deselect the product you want to remove it from. Once you've finished making your edits, click Save.
[Screenshot placeholder: Edit attributes slideout with the Product dropdown open]
If you'd rather keep the initiative on its original product as well, simply leave both products selected - see Mirror initiatives across products and columns.