
Microsoft Entra SSO
← Back to SAML section
-
Availability
- Plan: Roadmaps Advanced, Ideas Advanced, Feedback Advanced
- On a legacy plan? Click here for more info
-
Roles and Permissions
- Admins only
- Login from the Microsoft Entra dashboard into ProdPad.
- If you choose to verify your domain, the user can also login to ProdPad via Microsoft Entra if they go to https://app.prodpad.com/. Read more about domain verification here.
- Just-In-Time provisioning: if a user has never logged into ProdPad before and clicks on the ProdPad app in the application dashboard in Entra, a role will be created for them in your account. The role will have a Reviewer type unless the role attribute is configured.
- For Advanced Modular, Performance and Enterprise accounts, you can set up SCIM so that users are auto-provisioned. See here for steps to set this up.
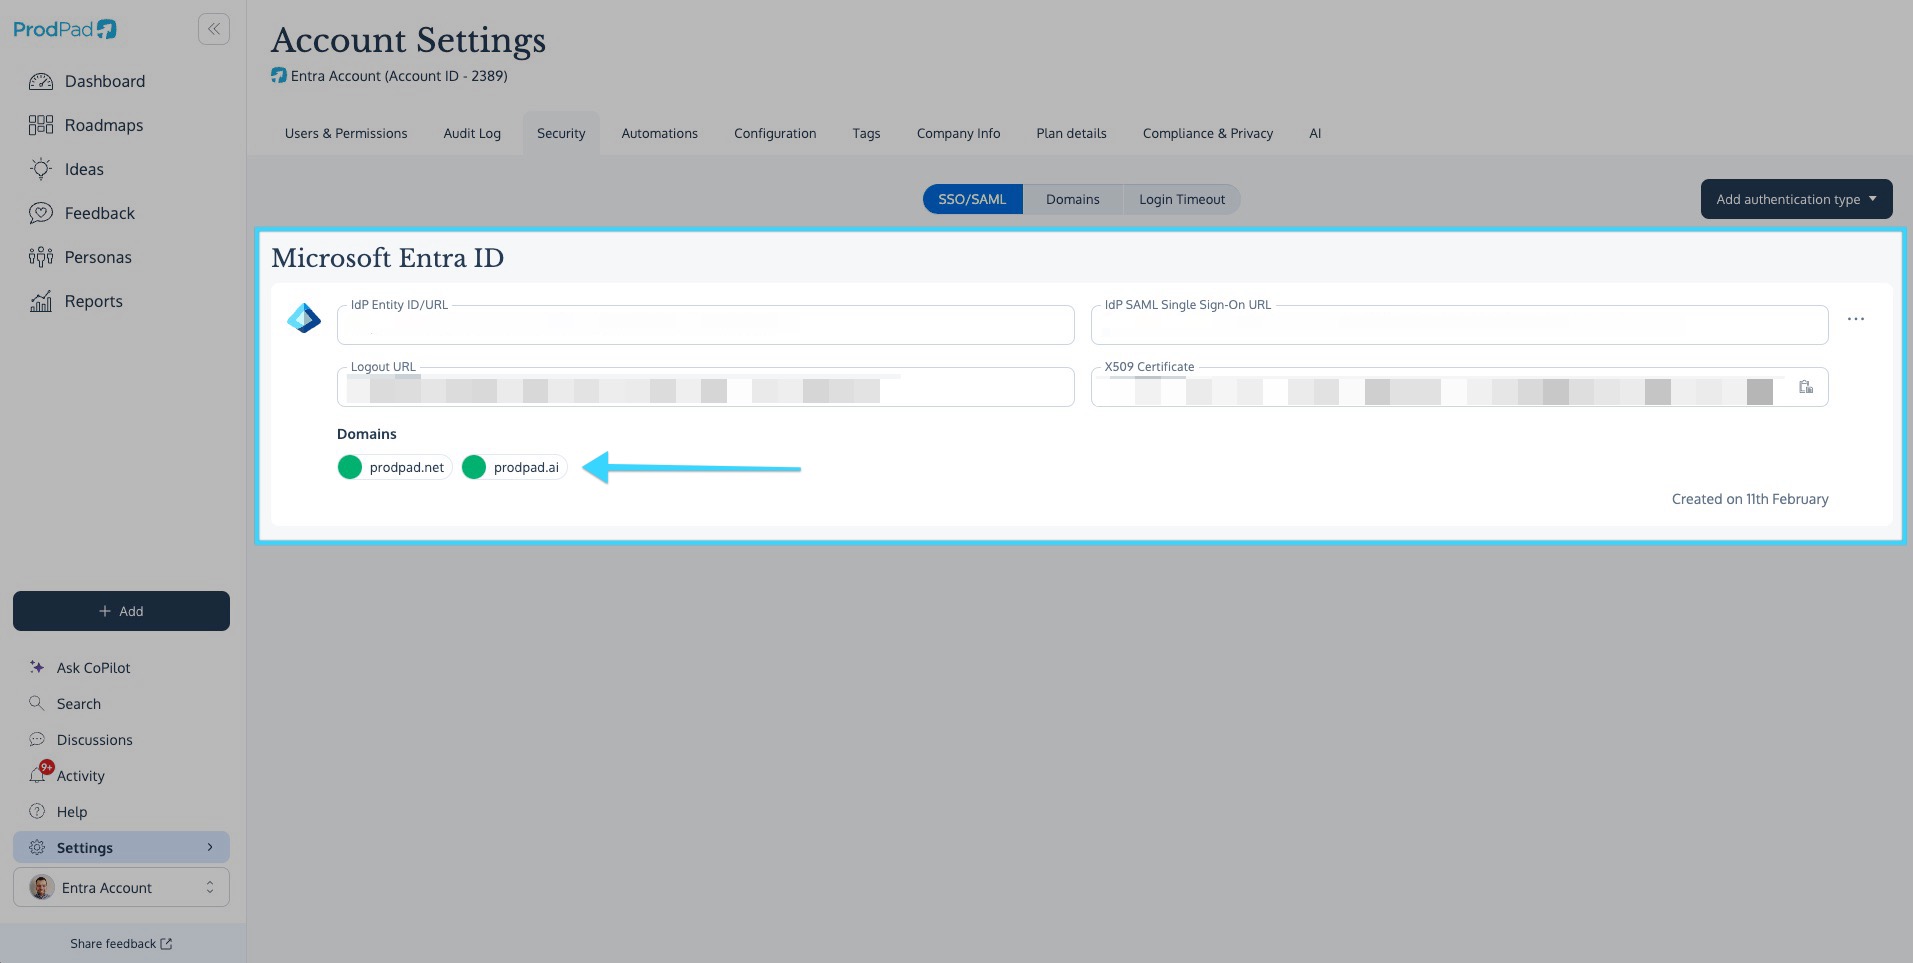
- To start with, go to Account Settings and select the Security tab.
- Now select the SSO/SAML sub-tab.
- Click the "Add authentication type" button and select Microsoft Entra ID from the dropdown menu

- Keep the modal open and navigate to Microsoft Entra.
- Sign in to the Microsoft Entra admin center as at least a Cloud Application Administrator.
- Browse to Identity > Applications > Enterprise applications > New application.
- In the Add from the Gallery section, type ProdPad in the search box.
- Select ProdPad from the results panel and then add the app. Wait a few seconds while the app is added to your tenant.
Alternatively, you can also use the Enterprise App Configuration Wizard. In this wizard, you can add an application to your tenant, add users/groups to the app, assign roles, as well as walk through the SSO configuration as well. Learn more about Microsoft 365 wizards. - Browse to Identity > Applications > Enterprise applications > ProdPad > Single sign-on.
- On the Select a single sign-on method page, select SAML.
- On the Set up single sign-on with SAML page, click the pencil icon for Basic SAML Configuration to edit the settings.

- On the Basic SAML Configuration section, the user does not have to perform any step as the app is already pre-integrated with Entra.
- Click Set additional URLs and perform the following step if you wish to configure the application in SP-initiated mode:
In the Sign-on URL text box, type the URL:https://app.prodpad.com/login - Click Save.
- ProdPad expects the SAML assertions in a specific format, which requires you to add custom attribute mappings to your SAML token attributes configuration. The following screenshot shows the list of default attributes.

- In addition to the above, ProdPad expects a few more attributes to be passed back in the SAML response, which is shown below. These attributes are also pre-populated, but you can review them as per your requirements if needed:
- On the Set up single sign-on with SAML page, in the SAML Signing Certificate section, find Certificate (Base64) and select Download to download the certificate and save it on your computer.

- For multiple account users, additional configuration is required. We have a separate guide for this that you can read here.
- On the Set up ProdPad section, copy the appropriate URL(s) based on your requirements:

- Navigate back to ProdPad and continue from the open modal.
- Copy into the field labeled "IdP Entity ID/URL" in ProdPad, the URL from the field "Microsoft Entra Identifier" in Microsoft Entra.
- Copy into the field "IdP SAML Single Sign-On URL" in ProdPad, the URL in the field "Login URL" in Microsoft Entra.
- Copy into the field "Logout URL" in ProdPad, the URL in the field "Logout URL" in Microsoft Entra.
- Paste the text of X.509 certificate (public key generated above) into the X.509 certificate field.

- If you have multiple accounts on your ProdPad plan you can select these in the Associate Accounts field. Note: you must be a user in an account before you can associate it to the authentication type.

- If you select the IdP login (login is done solely through your SAML provider) option, you users must log in from the Microsoft Entra dashboard, rather than from the ProdPad login page.
- Click Save. Your users can now use the ProdPad app link on their Microsoft Entra dashboard.
- If you select the IdP & SP (login through a domain as well) option:
- You must set up the Domains that your users can log in from and add them to the SSO. You can read more about how to do this here.
- Once you have set up and verified the domain, select it from the Domains list. Note: for a domain to appear as an option here, it must be verified under the Domains tab and added to the SSO.
- Click Save.
- On the side menu for the ProdPad enterprise app, select Provisioning.
- Set "Provisioning Mode" to Automatic.
- Under "Admin Credentials, in the field "Tenant URL" enter the URL https://api.prodpad.com/api/v2/scim
- In ProdPad, go to the API key tab (https://app.prodpad.com/me/apikeys) copy the API key and then paste that into the Authentication Token field in Microsoft Entra.
- Click "Test connection" and once the test passes (it will say connectivity confirmed).

- In Target Objects select Create, Update and Delete.
- In attribute mappings ensure you have the following configuration:
Microsoft Entra Attribute customappsso Attribute Matching precedence userPrincipalName username 1 Switch([IsSoftDeleted], , "False", "True", "True", "False") active userPrincipalName emails[type eq "work"].value givenName name.givenName surname name.familyName - Now click "Save"
- Under "Settings" set "Provisioning Status" to On.

- Click "Save".
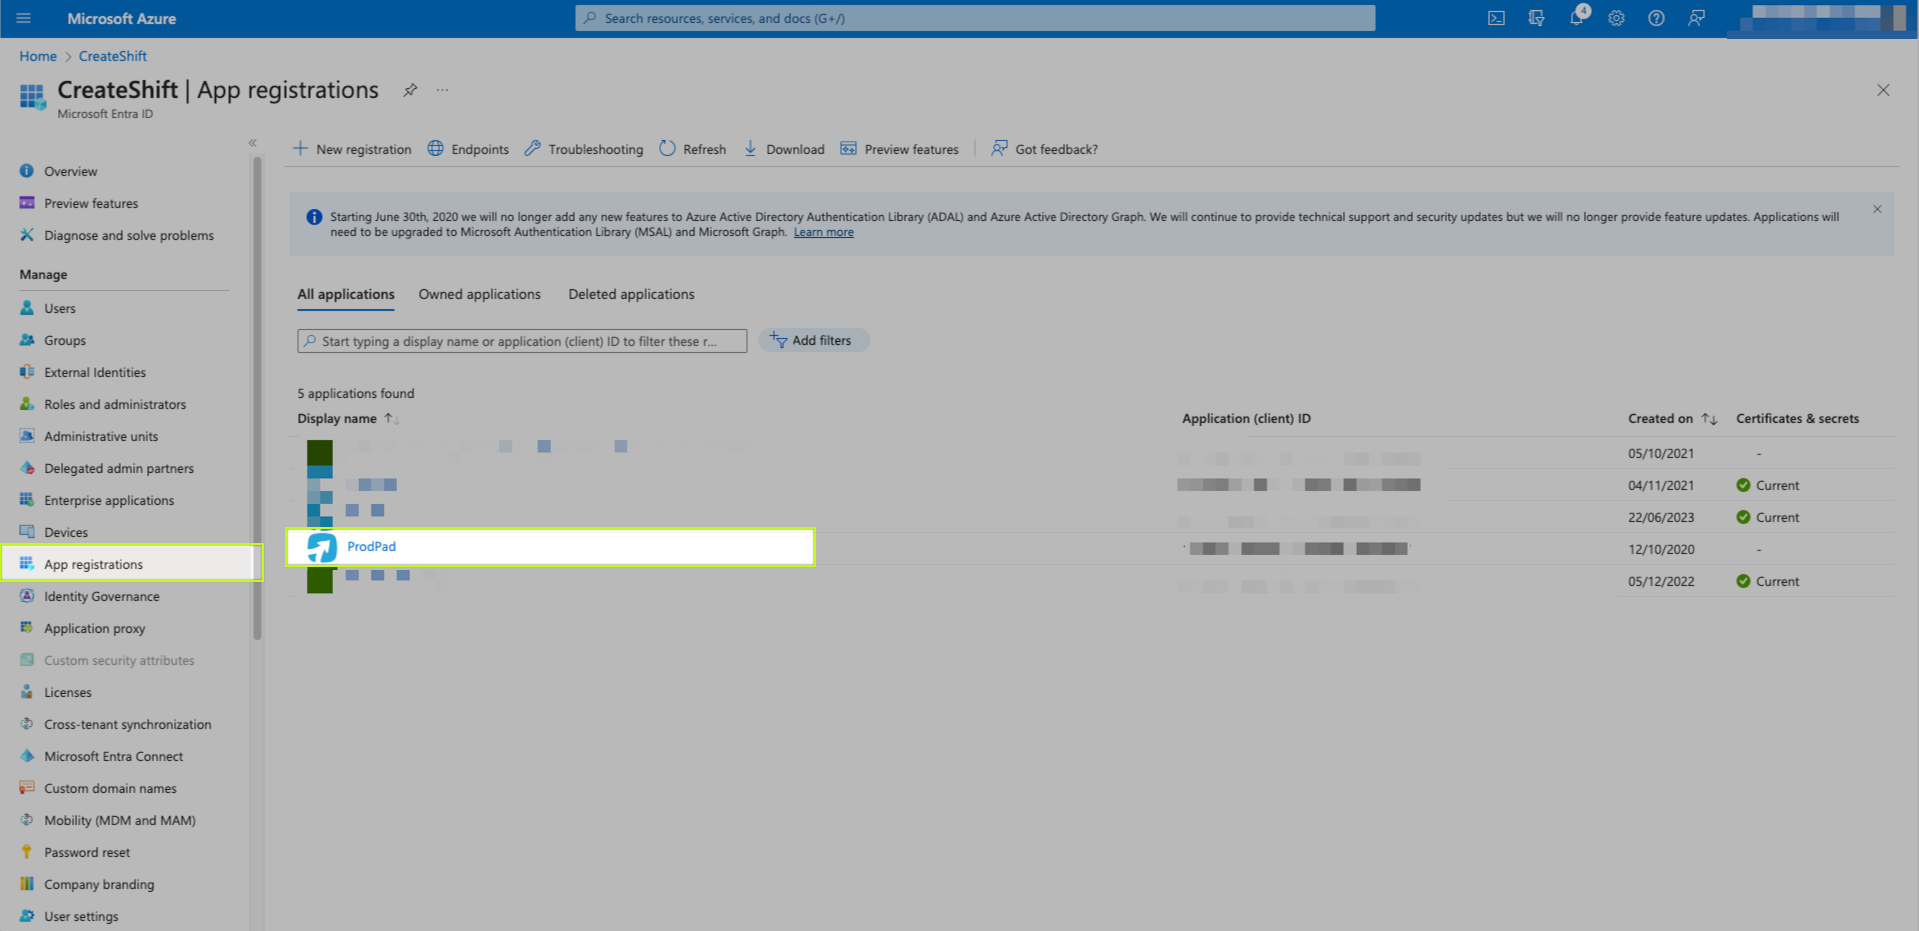
- Browse to Microsoft Entra / Entra ID > App registrations and then select the ProdPad application
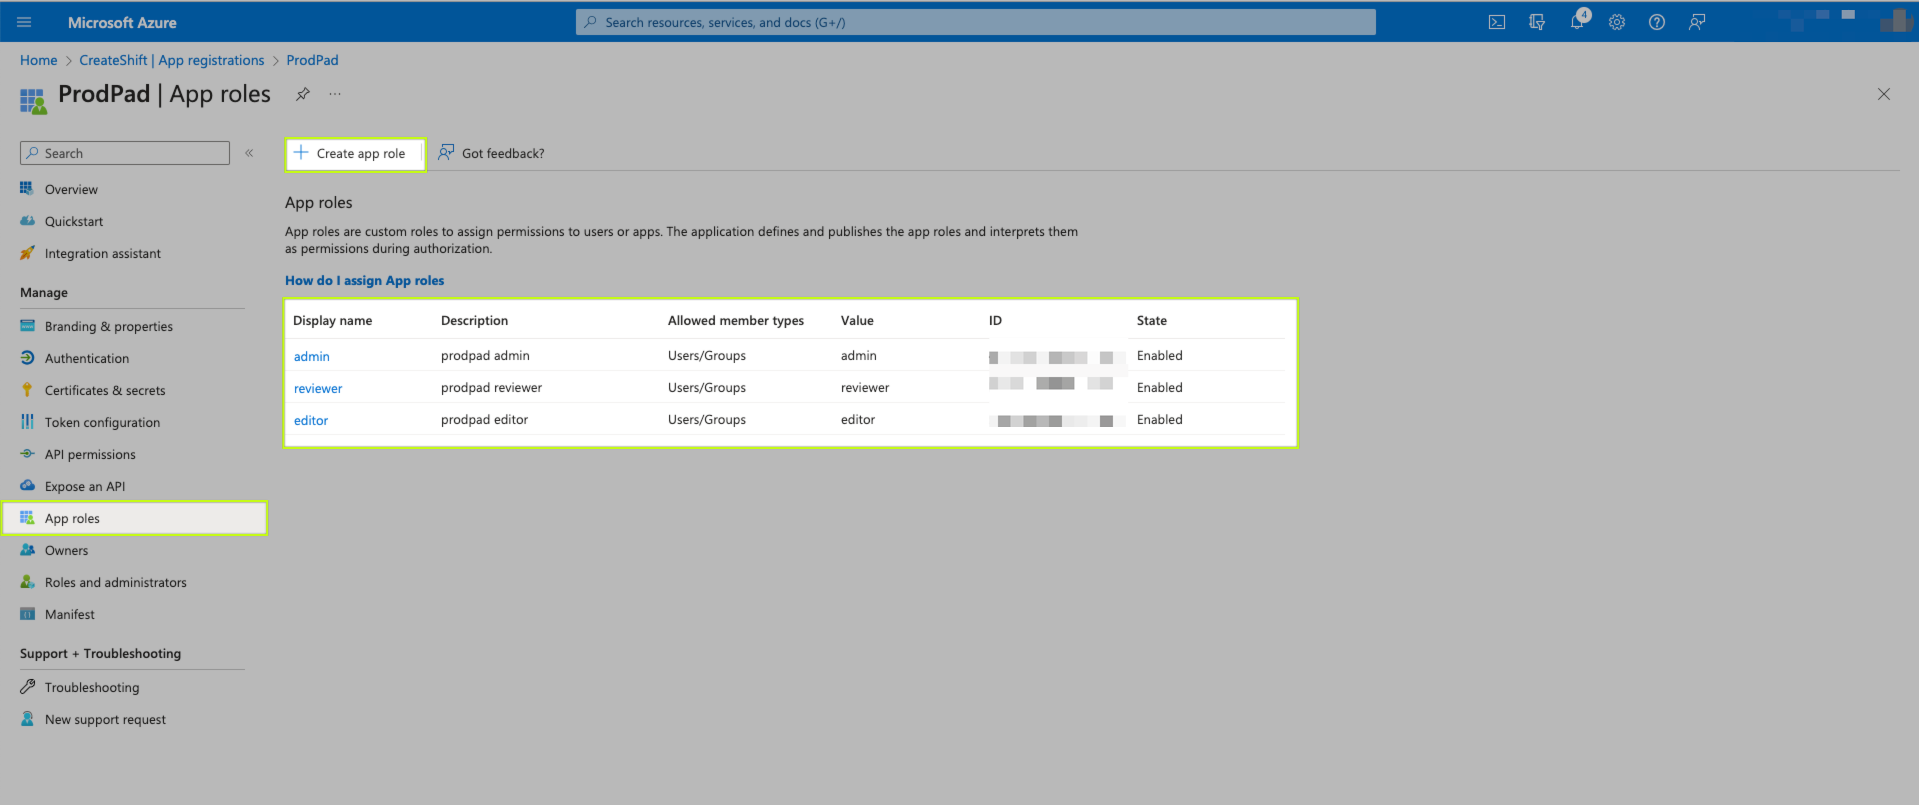
- Under manage select App roles, and then select Create app role.
- In the Create app role pane, enter the settings for the role. The values must be lower case i.e. admin, editor, reviewer.
- Select Apply to save your changes.
- go to the ProdPad app under Enterprise applications and select Provisioning
- Open Edit attribute mappings > Mappings > Provision Microsoft Entra Users
- Tick Show advanced options and click Edit attribute list for customappsso
- Add a new customappsso Atribute with the following settings
- Name
urn:ietf:params:scim:schemas:extension:prodpad:2.0:User:role - Type String
- Name
- Save
- Now go to Attribute Mappings > Add New Mapping
- Create an attribute mapping with the following settings:
- Mapping type Expression
- Expression SingleAppRoleAssignment([appRoleAssignments])
- Target attribute
urn:ietf:params:scim:schemas:extension:prodpad:2.0:User:role - Match objects using this attribute No
- Apply this mapping Always
- Click OK
Using Microsoft Entra allows you to set up a direct link from your Microsoft Entra dashboard to ProdPad. This will allow users to log in to ProdPad without having to enter a password in ProdPad.
Note
Please check your account subscription. The steps in this guide are for Advanced Modular, Performance and Enterprise plans and accounts with the Governance Power-up, Advanced plan customers will see slightly different configuration steps, which can be seen here.
Microsoft Entra ProdPad link supports the following capabilities:
Important!
If you currently have another authentication method enabled such as Google or Slack, please disable them prior to installing SAML. For further help, please refer to our Implementation Check.
In this article:
Getting Started

In Microsoft Entra
Configure Microsoft Entra SSO


| Name | Source Attribute |
| User.FirstName | user.givenname
|
| User.LastName
|
user.surname
|
| User.ProdpadRole
|
user.assignedroles
|
Important!
ProdPad expects roles for users assigned to the application. Please set up these roles in Microsoft Entra ID so that users can be assigned the appropriate roles. To understand how to configure roles in Microsoft Entra ID, see here.


Configure ProdPad SSO


Now you must decide whether you want your users to log in to ProdPad by IdP-initiated login only, or by IdP and SP-initiated login.

To test this, you can now go to the Microsoft Entra application dashboard and click on the ProdPad app icon. You should then be logged into ProdPad. If you have verified your domain and set up the configuration, you can go to https://app.prodpad.com/login and enter your email. You'll then be shown a button to log into ProdPad via Microsoft Entra.
Microsoft Entra with SCIM Provisioning
Once you have created your app in Microsoft Entra you can opt to configure SCIM to auto-provision your user access and authentication in ProdPad


Important!
It should be noted that Microsoft Entra with SCIM Provisioning isn't available on Legacy Advanced plans and Modular plans without the governance powerup.
Role provisioning in Microsoft Entra
Microsoft Entra needs some changes to the default settings in order to get role provisioning working with ProdPad.
Add app roles for the ProdPad enterprise app
So that Microsoft Entra has the roles available for assignment you need to create the custom role.
You can read more about how to do this here - https://docs.microsoft.com/en-us/azure/active-directory/develop/howto-add-app-roles-in-azure-ad-apps
Configure the provisioning app to pass over role attributes
Now you need to edit the provisioning attribute mappings for ProdPad to pass the role in the Create and Update requests.
Important!
We currently do not support Group provisioning, but if this is something you'd like to see as a feature, let us know here!
Legacy Plan Availability
| Azure Active Directory SSO is available on the following legacy plans: |
| Performance |
| Enterprise |
| Any Modular Plan with Governance Power-up |