
Setting up a Status Sync integration for Jira Cloud
← Back to Jira section
-
Availability
- Plan: Ideas Advanced
- On a legacy plan? Click here for more info
-
Roles and Permissions
- Add: Admin, Editor
- Edit: Integration Owner
- Delete: Integration Owner
A Status Sync integration between Jira and ProdPad allows you to push any idea from ProdPad to Jira, creating a link between the idea and the new ticket. You can map your Issue statuses in Jira with the custom statuses in ProdPad, and so when the status is updated in Jira, the change reflects in your ProdPad account where the rest of the team can see it.
Our Jira integration supports Jira Cloud, Server and NextGen projects. If you are a Jira Server customer you will want to read this article.
Getting the integration with Jira set up is easy, and just requires you to follow these steps:
- Step 1: Create the integration
- Step 2: Connect your Jira account
- Step 3: Map Jira project and issues
- Step 4: Map Idea fields to Jira issue fields
- Step 5: Map ProdPad user story fields to Jira issue fields
- Step 6: Map Jira statuses to ProdPad Workflow stage
How to use the integration
Step 1: Create the integration
Click on the Integrations icon from the bottom left-hand side of the navigation bar.

Click Create an Integration and then select Jira Cloud from the Development menu.

You'll then be given the choice of integration you'd like to create. In this help article, we'll be setting up a Jira Status sync integration, which you can find on the right-hand side of the selection menu. Once you've selected this option, click Next to move to the next step.

You'll then be prompted to give your integration a name - this is to help you and your team identify your integration, which is useful if you’re planning to set up multiple integrations to different Jira projects. When you're ready to move forward, click Connect.

Step 2: Connect your Jira account
After clicking Connect, you'll see an Atlassian account confirmation screen pop up. Once you've selected your account and accepted, the screen will close, and you'll return to ProdPad. Click Next to move on to mapping ProdPad to Jira.

Note: We have moved to OAuth 2.0 authentication, therefore it is no longer necessary to create app links for Jira Cloud integrations with ProdPad. However, if you have existing Jira integrations, it is best to leave the app link in place, as deleting may invalidate active tokens and break those integrations.
Step 3: Map Jira project and issues
This is the stage where you will choose which Jira project the integration will connect to, and dictate how information in ProdPad will map into Jira.

If you need to push ideas in ProdPad to different projects in Jira, set these up as separate integrations.
For the best results with this integration, the mapping we recommend is:
- A ProdPad Idea = A Jira Epic
- A ProdPad User story = A Jira story.
Mapping a ProdPad Idea to an Epic allows for there to be a parent/child linked relationship between the story issue type. Setting ProdPad ideas to become Epics will mean that user stories can be mapped to Jira stories - creating a parent/child link in Jira. If you choose to map your ideas to a base-level issue type in Jira - for example, Task - then ProdPad user stories can still be mapped to Jira, but they will not have the parent/child link. Once you've finished setting up your mapping, click Next to continue to the next step.
Step 4: Map Idea fields to Jira issue fields
Once you’ve selected the Project and Issue type in Jira, you’ll be shown a form that allows you to map the fields on the Idea canvas to the fields in Jira. For convenience, the Idea fields will be automatically mapped depending on the Jira issue type option you selected for Ideas in the previous step, but the default mapping for these fields can be changed as required. You can also map multiple ProdPad fields to one Jira field if needed. Once you've finished setting up your mapping, click Next to proceed to the next stage of the integration setup.

The mapping will change whether you are using the issue type Epic or Story. You can click the + Add mapping button to map more fields for your ideas.
For an Epic, an example mapping would be:
| Jira Field Type | ProdPad Field Type |
| Summary | Title |
| Description | Description, Business Case, Functional Specs, Notes |
| Epic Name | Title (optional) |
| Labels | Tags |
| Attachments | Designs, Files |
For a Story, the suggested mapping is:
| Jira Field Type | ProdPad Field Type |
| Summary | User Story |
| Description | Acceptance Criteria |
This assumes you are pushing ProdPad user stories to Jira Story issue type. If you are planning to push ideas as user stories, then we suggest the following:
| Jira Field Type | ProdPad Field Type |
| Summary | Title |
| Description | Description |
| Business Case | Functional Spec |
It should also be noted that whilst Jira has default field types, you can create your own fields to map ideas and user stories to in Jira. The above mapping is an example of the possible mapping types available with this integration. If you'd like to see how to show more Jira fields in ProdPad, click this link here
Step 5: Map ProdPad user story fields to Jira issue fields
Next up is mapping Prodad user stories to Jira issue fields. As with Ideas, the User Story fields will be automatically mapped depending on the Jira issue type option you selected for User Stories in the previous step, but the default mapping for these fields can be changed as required. As stated above, you can click the + Add mapping button to map more fields for your user stories.

Step 6: Map Jira statuses to ProdPad Workflow stages
Once you’ve got your Jira integration set up to this point, you get the option to map your Issue statuses in Jira to your Idea statuses in ProdPad. You can also create custom statuses under your workflow options. As previously stated, you can add more mapping by clicking the +Add mapping button.

Click Activate to create your integration.
Using the Jira Full Sync integration
Pushing an idea from ProdPad to Jira
Now that you've got an active, Status sync integration with Jira set up, it's time to start pushing finished ideas from ProdPad to Jira.
Head to your Ideas List, and pick an idea that's ready for development. In the Idea Canvas page, click on Push To Development. This will open up a modal window where you can choose to push the Idea via the Jira integration you've set up, or any of your other integrations.
You will also be prompted to push over user stories. If you chose to do so, any associated user stories will be pushed to Jira as a user stories and associated to the Epic that the idea becomes (assuming the issue type selected for the Jira integration is Epic).
If you have any required fields, you will be asked to enter them before pushing.

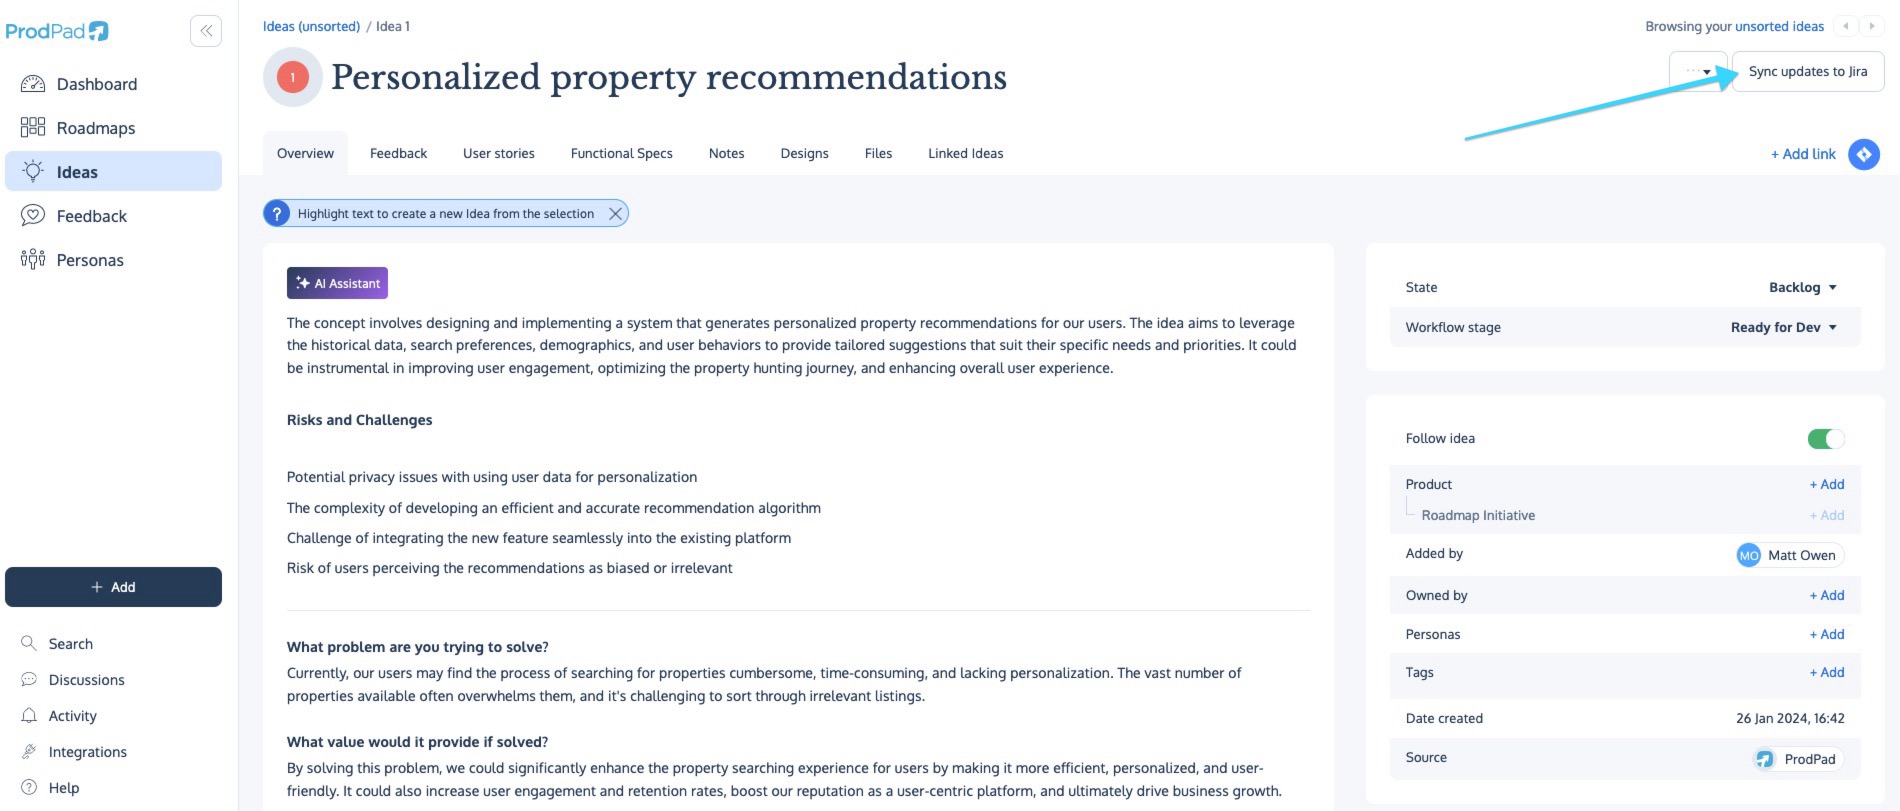
There will now be a link to the Jira ticket in the Links section at the top of the Idea. The ticket in Jira will also link back to the ProdPad Idea.

If you have configured the Status Mapping in Part 6 of this guide, any changes to the issue status in Jira will automatically update the Idea status in ProdPad as part of the Jira Status sync integration.
If you make any changes to a pushed Idea in ProdPad, you'll notice the Push to development button on the top right-hand side of the Idea page changes to Sync updates to Jira. Clicking this button after you make changes to a pushed Idea will update the linked Issue in Jira instead of creating a separate new Issue.
Top Tip
Looking to add multiple projects? If you wish to setup another project within Jira, simply repeat the steps above. You may set up as many integrations as you like - and as long as they're the same account (base URL) they will only count as one integration.
Sharing an integration
Working as a team? No problem! You can set your Jira integration to teamwide, allowing you to share your setup with other users in your account. This will allow the entire team (editors and admins alike) to use the integration as needed. Learn more in Enabling Team-Wide Integrations.
If you would like to provide feedback on our Jira integration or this document we would love to hear from you via our portal.
| Jira Status Sync for Jira Cloud is available on the following Legacy plans |
| Modular V1 with Dev Power-up |
| Essential or Advanced |
| Performance |
| Enterprise |